Sunday, January 31, 2016

Little Moments

Here is layout 3 that I created using this DCWV Paper Stack. You can read more about why I chose to use this, and my other 2 layouts HERE & HERE

 I love the colours of the plaid paper. I put some gesso on the background page then I used some Mister Hueys Mist in Taxi and a large household paintbrush, then lightly brushed broad strokes over the gesso.
Next I layered some messy thread on the page for some texture, then I fussy cut the frames from another sheet in the DCWV Paper Stack. I added some photos and tissue paper behind them, and then adhered it all down with my hot glue gun.


I used my sewing machine and stitched a strip of paper down the left hand side. For the embellishments I used some older October Afternoon and Maggie Holmes. Last, I scattered sequins across the page and adhered them with Glossy Accents.

Thanks for stopping by and I hope that I have inspired you to create something today!
Photobucket

Friday, January 29, 2016

At The Bus Stop

Today I am going to share with you layout 2 of 4 that I created with this DCWV paper stack. You can read more about why I am using this paper in yesterdays blog post.

 Here is what I created
 I added gesso to the background, then smooshed some mist on with some plastic packaging. I also added some splatters
 I added lots of messy thread for texture, then I stitched my title down.
 I fussy cut then layered the clouds with some thread and hot glue. I also painted around them with some grey watercolour paint to give some depth.
 I did lots of fussy cutting and layering
I then added a fun flair that my friend Toni From from The Inspired Planner made!

Thanks for stopping by, and I hope you were inspired to get messy today!
Photobucket

Thursday, January 28, 2016

Playing Legos With Papa


So, I have had this paper pad lying around my scraproom for years.  It was given to me as a gift. I had never even touched it. I will be honest, just looking at it, I was not interested. I didn't think it was my "style". Well, guess what? I challenged myself to at least create 1 layout with this pad before I purged it. I didn't create just 1 layout, I created 4!!! 
Today I am going to share with you the 1st of the 4 layouts!

I added some gesso to the background, and then smooshed some blue and yellow mists with a piece of plastic packaging

 I added some stamping and I also fussy cut out the banner and hot glued it to my page
 I also added lots of enamel dots & sequins
 I fussy cut the dinosaurs out, placed some messy thread behind them and then hot glued them down.
I worked with several different alpha stickers to create a fun title.

I am so glad I challenged myself to create a layout with this paper pad because it turned out to be one of my favourite layouts ever!

Photobucket

Wednesday, January 27, 2016

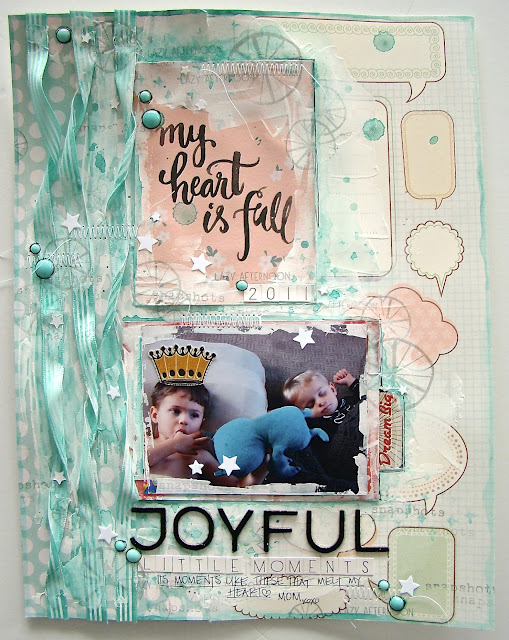
Joyful Little Moments

This layout was inspired by the amazingly talented Ashli Oliver aka Soaphouse Mama over at Purplemailbox


First off, I decided to just use stuff that has been sitting around in my scrap stash. These were all items I was going to purge, but then challenged myself to see if I could create something with them.


For the background, I used my hot glue gun to adhere the twisted ribbons, pink card and photo. Next I used a spatula and added gesso over everything. Next I used some mists and painted the background with my waterbrush. 

 I then added some stamping and lots of stitching to the layout.

I am really pleased with how this layout turned out, and that I used up some product I was going to get rid of!

Also I have a YouTube Channel! I will be starting to post process videos and unboxing videos. I'd love for you to check it out, and subscribe!!! You can find it HERE
Photobucket

Tuesday, January 26, 2016

Ready To Fish


So I have been on a bit of a scrappy binge this month. I finally found my mojo again. At the end of December, Clay and I decided to give the boys my scraproom, for their toy/lego room and I would move out into the family room. I was so excited! I have wanted to do this for the past 2.5yrs. I missed having my scrap area out in the family room like at our old house. I hated being stuck in another room, alone. I scrap better when I am in the thick of things, with chaos around me.
Here is a picture of some of my albums, all my paper & my stamps, most of my mists and embellishments.

So far this month I have made 13 layouts and 4 weeks of project life and 1 card. Also I have purged a rubbermaid tote of supplies!

I am going to post a layout every day for the next little while on my blog, along with my December Daily 2016!

Here is the first layout I want to share with you! 

I created this using the October Afternoon Treasure Map Collection.


I used the packaging technique and put "smushed" some different mists onto the background, and then added some splatters.


I also added some messy thread behind the ship sticker.


I used my sewing machine and did lots of stitching on the layout.

I hope I have inspired you to create something today!

Also, I now have a YouTube Channel!
You can find me HERE. I have my first video up and I plan on starting process videos! I hope you stop by and subscribe!
Photobucket

Monday, January 25, 2016

Project Life Wk 4


 Today I want to share with you my Week 4 of Project Life using the Noel Mignon Daily Diary Kit - Sweet Charlotte.
I am in love with the colours of this months kit! Soft and pretty with pops of bold colours, like the yellow pom pom trim, and the enamel dots.
Here is the right side of the spread. I added another shaker pocket this month with the gorgeous confetti from Pretty Little Studios.
Here is the left side of the spread. The acetate card reads backwards, because it was on last weeks spread, but that doesn't bother me. I like the "see through" element.
 Here is a close up of it. I love all the stitching that I have been incorporating this year. 
 I added some Stickles to my cards
 I love the alphas that were included this month. They add a fun pop of color!
 I also created my own 4x6 cards by stitching together 2 of the 2x4 cards that came in the kit.  Another element I like are the flowers that were included this month. They are perfect because they lay flat, so they don't bulk up the pages!

Thanks for stopping by! I hope I have inspired you to create something today!


Monday, January 18, 2016

Project Life Week 3


 Today I want to share with you my 2016 Project Life Week 3 spread, using the 

 I have added a 6x12 insert this week also.
 I used the bottom part of the insert to create a shaker pocket, adding the Pretty Little Studio Confetti Mix that came in the kit.
 Here is a picture of the layout together minus the insert.
I used my sewing machine to stitch the yellow pom pom trim that was included in the kit, to the edge of my page. I also created some more shaker pockets.
 Here is a close up of the insert.
 I created a fun paperclip using one of the yellow pom poms from the trim.
 Here are a few more close ups.
I loved working with this kit! There were so many fun little bits in this kit, and the colour combination was gorgeous. 


Monday, January 11, 2016

PL Week 1 & 2 of 2016


Happy Monday! 
Today I want to share with you Week 1 and 2 of my 2016 Project Life using the Noel Mignon Sweet Charlotte Daily Diary Kit.
Here is Week 1. I love the Dear Lizzy cards that were included in this months kit.

Here is Week 2. I love the mix of colours in this months kit! 

There are lots of fun elements included in this months kit like Flair, Puffy Stickers, Enamels Dots and more

The clear cards are a fun element to add to a page. 

The Basic Grey Sticker Tab was perfect to stitch at the top of my Week 1 card. And that Dear Lizzy floral puffy sticker makes me wish I had more!!

 I had decided before I started PL for 2016 that I wanted to add texture to the edge of my pages, just like my December Daily, so when I saw the fabulous yellow pom pom trim, my heart did a little leap!

I added lots of Stickles from my stash to the cards to add a little bling.

I used the grey stripe packaging from the Dear Lizzy Stickers, to the bottom of my Week 2 date card.

I LOVE the Pretty Little Studio confetti that Noel included in this kit! 

I love how this card turned out! The moment I saw it, I knew I wanted to add a photo to the center of the lens.

The Basic Grey alpha stickers are perfect for layering! And the Webster Pages Enamel Dots in this months kit are hands down, my favourite!


Related Posts Plugin for WordPress, Blogger...