Friday, August 31, 2012

Making Your Own Patterned Paper


Good Morning Everyone! Today I am up with a new project for 

Practical Scrappers. I am going to be showing you how to 
make your own patterned paper for scrapbooking and card making.

To start with I used my triangle stamp, watercolour pencils and
StazOn Ink in Jet Black

I stamped random triangle all over my white card stock

I then coloured them in with my watercolour pencils. I then
went over each triangle with my paint brush and water to blend them

And here is a close up.

Thanks for checking out my project. Have you ever made your own patterned paper? I would love to see your creations.....share your link with me!
Photobucket

Friday, August 17, 2012

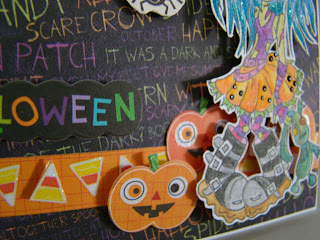
Scrapbook Stamp Society - Zombie Card

Here is a card I made for Scrapbook Stamp Society 
using Heather Valentin's Digi Stamp - Zodie Zombie & her Bunny.  
I printed my stamp out on American Crafts White Textured Cardstock, then coloured her in with my Watercolour Pencils.  Next I added some Stickles to her hair for some sparkle, and then added some black pearl dots to her skirt with my Viva Pearl Pens.
I did a lot of fussy cutting with this card
with my Cutterbee Honey Bee Scissors.
 I hand cut  my  Digi Stamp then put foam pop dots behind
 her to add some dimension to my card.
 I hand cut the pumpkins and the candy corn from some border sticker I had, then put some foam pop dots behind them, to pop them off the page.
For the spider, I hand cut it from some scrap halloween paper,
 then put a foam dot behind it.
 I then used a single strand of twine to make
a spider web for the spider to hang from.
Photobucket

Saturday, August 11, 2012

Transparencies

Hello!!! Today I am doing a quick tutorial for Practical Scrappers!  

Dig deep into you scrap stash......do you have any transparencies in there? Do you love how they look but your just not sure how to work with them?  Well today I am going to show you one idea on how to use them!
Hambly Cloud Transparency
(photo from Hambly)
Here is a layout I created using one.  This comes in a 12x12 sheet.  It has been cut down to 6x12. I put it on the top portion of my patterned paper.  Next I used my cropadile and punch holes in all 4 corners, going through the patterned paper and the cardstock.  I then pulled out some brads, and used them to attached both the transparency and the paper together....and voila!  Easy peasy!  


Supplies Used
Studio Calico Summer of 69 Kit and Add On 1, 2 & 3
Vellum
EK Success Border Punch - Diamond Lace
My Minds Eye Indie Chic Nutmeg Family - Laurel Burst Paper
October Afternoon Woodland Park - Cat Tail Pond Paper
My Minds Eye Washi - Blue Chevron
Freckled Fawn Glass Tape -Days of the week
October Afternoon Woodland Park - Designer Brads
Prima - Say it in Crystals
Basic Grey Brads - Jovial
Stickles - Stardust
October Afternoon Mini Market Alpha's - Blue & Cream
Pebbles Alpha's - Sunny Side Cream Corrugated
Zing Embossing Powder - Silver Metallic & Blue Glitter
Tsukineko Embossing Powder - #11 Iridescent
Fiskars Cloud Punch - Medium & Large
American Crafts Precision Pen Black 03
A Life Handmade - Tab Tag
October Afternoon Woodland Park - Stickers
Versamark Stamp Pad
Glue Glider Pro

Thanks for taking the time to view my post! Let me know what you think!
Photobucket

Monday, August 6, 2012

The Other Side Of The Lens

Ok, well here I am....today I decided to step out from behind my camera and snap a photo of me.....For anyone the knows me, I hate having my photo taken....I need to loose some weight.  Its been an extremely slow go....but I am working on it.  I realized, through all my scrapbooking, that really, I do not have very many photos of me.  So I am trying to change that......I never show myself, because of the fear of being judged....and that is so not me....I am a kind, generous, loud, stubborn, speaks her mind kinda person....but when it comes to my weight....I clam up....so, maybe, I'll be a little braver in the future, and post a full pic of me...but until then, this is what you get! lol! Thanks for listening to my ramblings!


Photobucket

Thursday, August 2, 2012

Scrapbook Stamp Society Blog Hop

Welcome to the Scrapbook Stamp Society 
Too Cute to Spook
Blog Hop!!!


For my project I chose to use 
Heather Valentin's - Witchy Susie

I used my Water Colour Pencils to colour in my digi stamp, then painted
over it with water to soften and blend the colours.

  
I cut my image out, and attached her to my card.  I used my 
Black Pearl Pen to make the black dots on the orange scalloped 
border.  I also hand cut the beetle out of some halloween paper, then 
put a foam dot behind it, to pop it off the page

Next I added some Black Stickles to her eyes and
some Star Dust Stickles to the cats eyes

I also added some more Star Dust Stickles to her Skirt


Don't forget to leave a comment! 
One lucky hopper who is a follower of the blog & 
who comments on all the participants blog post,
 will win a $12 Scrapbook Stamp Society Prize!


Thanks for stopping by!


your next stop on the blog hop is


Photobucket
Related Posts Plugin for WordPress, Blogger...